Sunday, December 26, 2010

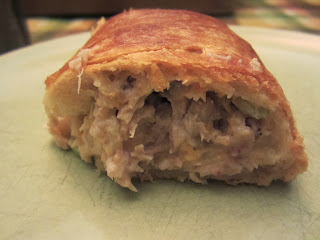
Day 12 of 12 - Turkey Cranberry Wreath


Well, we made it. Twelve Days of Christmas....it's over, and today is the day of leftovers. Thanks so much for sticking with me through the season. I hope you were able to try some of these recipes, I hope some of them were new. I hope some become your favorites and ones that you'll want to do for years to come. So, the day after Christmas, the eternal question is "What will you do with your leftover turkey?"  How will you eat it. Turkey Noodle Soup, Turkey Tetrazzini, plain old turkey sandwiches (don't forget to use the leftover Cherry Berry Mold on the bread.... yeah....). This one thing that we do every year. I only make it once a year, I don't know why. I'm imagining it's because we don't often have turkey leftovers!


Something you may not know about me is that I was a Pampered Chef Consultant for a while - this recipe is one that was in a very old catalog (2000 I think). And one of the reasons I continue to love their recipes! IF you have a pizza stone, great. If not, a large round pan - or lay out in one long loaf instead of a wreath.

Turkey Cranberry Wreath

2 pkgs (8 oz) Bueller's crescent rolls
1/2 cup Tate's mayonaise
2 Tbs Tate's honey dijion mustard
1/2 tsp coursley ground black pepper
2 cups cooked turkey, chopped
1/2 cup celery, chopped
3 Tsp dried Parsley
1/2 cup Southern Grove dried cranberries
4 oz shredded cheese (they recommend swiss, I use cheddar b/c I hate swiss)
1/4 cup Southern Grove walnuts
1 egg separated


Preheat oven to 375. Unroll crescent dough and spearate into 16 triangles. With wide ends of triangles toward center, arrange 8 triangles in a circle on large round stone (or large round baking sheet). Corners of wide ends will touch and points will extend 1" beyond the edge of the stone. Match wide end with each remaining triangle to wide end of each outer triangle. Seal center seams using Dough and Pizza Roller. Points will overlap in center DO NOT SEAL.

In large bowl, place turkey, celery, parsley, cranberries, cheese and walnuts. Add mayonnaise, mustard and pepper. Mix well.

Scoop filling over seams of the dough. Fold triangles over (in order) over the filling. This creates the "wreath" Tuck the last end under the first when all the way around.

Separate egg, beat white. Brush over the dough. Bake 25-30 minutes until golden brown.

Instead of doing as a wreath, you can also do as little pockets...use two cresents and seal together as rectangles. Fill in the center and pull edges up to create a packet. Seal edges together.

Enjoy

Saturday, December 25, 2010

Day 11 of 12 - Cranberry Sausage Stuffing w/ Walnuts

(no pictures yet, I promise soon!!!

I created this recipe many years ago. It was our first Christmas in this house. It was the first Christmas that I hosted my whole family. I cooked a big turkey that year, and was thankful for an Aldi right around the corner. I believe we had 16 or so people that first year. It was amazing, and a lot of fun. I came up with the following recipe because I wanted to have an "it" stuffing. The one that everyone remembered. The one that the kids would crave when they were grown up and missing home. The one that put my Christmas on the map. It was my first time hosting "the family" Christmas dinner. The torch had been passed to me, even though I was not the oldest, because I was a cook...I loved to cook and loved to entertain. And it was true. It was a lot of fun to host that first year, and in subsequent years. And on the menu each year is this favorite, as requested by my husband. It is now officially not Christmas dinner without it! :)


Cranberry Sausage Stuffing

1 1lb tube pork sausage (bulk)
1 small onion, diced
2 stalks celery, diced
2 Tbs Butter
2 box Cornbread Stuffing Mix
2 1/2 Cups Fit & Active Chicken Broth
1 cup Southern Grove dried cranberries
1 cup Chef's Cupboard French Fried Onion Strips
1/2 Cup Southern Grove chopped walnuts

Saute onion & celery in butter in a large stock pot (4 qt at least). After 5 minutes, add bulk sausage and brown. In a saute pan, brown sausage. Add chicken stock, and bring to a boil. Once boiling, add cranberries and walnuts. Turn off heat and add stuffing mix and fried onion strips. Stir well and cover pot. Allow to cool completely if you're stuffing into the bird. If serving without cooking in bird, fluff with fork first.

This will stuff about an 18 lb bird.

YUMMY!!!!

Friday, December 24, 2010

Day 10 of 12 - Pumpkin Pie Dessert Squares

Another gem from Joyce. We would have this dessert every year at Thanksgiving. My husband and I would drive the 12 hours to spend Thanksgiving at their house every year. Up until we moved to AZ. And now that we're back, we go every year again to visit Joyce. Dad is not there anymore, and we miss him very much. But the joy that he brought, and the memories of him live on in our relationship with Joyce.

This recipe takes me back to the first Thanksgiving we spent there. What an amazing spread we had. I was so stuffed, I could barely move. I had never been a fan of pumpkin, and dessert came out and I was scared. The obligatory small piece, I could suffer through it and not offend. Well, the joke was on me. This was pumpkin like I had never had before! OH MY GOODNESS. So creamy and rich, crunchy and gooey, and oh. My. You just have to make it and try it for yourself.

My oldest daughter LOVES this dessert, and so, for her, I make it every year. I lie. I make it for me. :) And for the memories it brings back. Of a man and his wife, who would open their home every year for our visit. Kill the fatted calf, and share the bounty with us. Joyce, we love you!!! Dad, we miss you.

Pumpkin Pie Dessert Squares

1 Pkg Baker's Corner Yellow Cake Mix
3 Golden Hen Eggs (divided)
3/4 Cup Country Creamery Butter (divided)
3 Cup Happy Harvest Pumpkin (about 2 cans)
2 Tsp Cinnamon (divided)
1/2 Tsp Nutmeg
1/4 Tsp Clove (if you like that flavor)
2/3 Cup Milk
1/4 Cup Baker's Corner Sugar


Preheat oven to 350.

Grease bottom only of a 13" X 9" pan.

Reserve 1 Cup Cake mix for the topping, set aside in a bowl and mix with 1/4 Cup Sugar, 1 Tsp. Cinnamon and 1/4 Cup Butter.

Combine remaining cake mix, 1/2 Cup butter, and one egg in a medium bowl. Mix well. Press into the bottom of the pan.

Mix pumpkin, spices, 2 eggs and milk in a separate bowl. Stir well to remove all lumps. Pour over crust.

Crumble reserved topping over the pumpkin layer.

Bake for 45-50 minutes, or until a knife inserted at the center comes out clean. Serve with whipped cream, or ice cream. Some kinda cream. C'mon, you need that! :)

Thursday, December 23, 2010

Day 9 of 12 - Cherry Berry Mold


Well, I'm straying a little from Aldi here - just one ingredient. I know, I've been sneaking them in a bit lately. I'm trying REALLY hard not to. I like to do as much as possible at Aldi. Well, they don't sell Cherry Jello - and they're not always stocked with whole berry cranberry sauce. THANKFULLY, they do have the cranberry sauce this time of year. If they don't have the whole berry, you CAN use the jellied - the texture will just be a little different. But the taste is just, unbelievably out of this world.

I got this recipe from my husband's step-mother, Joyce. What a wonderful woman. I love to hear her stories of growing up in Michigan. I love the stories she shares about her deceased husband, my father-in-law. I love the way she cooks. She would never exalt herself as a chef, and never take credit for the simple that she makes fabulous. It's not her style. But she makes a mean holiday spread! And this was always at the table, and now is on ours. And will be as long as I am alive to make it.

And lets just say, this makes a perfect spread for your after Christmas turkey sandwich!!!

Cherry Berry Mold

2 3 oz packages of Cherry Jell-O (you can use the Strawberry at Aldi, if you want to instead)
1 1/4 Cup Ice Cubes
1 Cup Boiling Water
1 Cup Happy Valley Sour Cream
1 Can Happy Harvest Whole Berry Cranberry Sauce

Dissolve Jell-o in boiling water and add ice. Stir until thickens. Remove any unmelted ice. Break up cranberry sauce with a fork and stir into gelatin. Fold in sour cream until the jell-o is marbled. Pour into a prepared mold, chill for at least 4 hours.

Wednesday, December 22, 2010

Day 8 of 12 - Grandma Foster's Chocolate Squares


I have never met Grandma Foster. But she is an image in history I strive to emulate. A God-fearing woman, who knew how to feed the masses. With chocolate. There's the legendary Grandma Foster's Chocolate Cake, which is, apparently so rich it must be served in a bowl of milk. There's Sketties - where the pasta is cooked in tomato juice imparting a certain essence to it that cannot be imparted in water. There are others....too many to name, I think. But, by far, the favorite are these Chocolate Squares.

The recipe is done in stages, so I'll abandon my normal procedures and type it out exactly as it's written on the card, which was dictated to me over the phone by my mother-in-law. This recipe is one of procedure, so follow it!

For those of you who live in the north, you will know these by another name: Nanaimo Bars. Nanaimo Bars have a rich history, wonderful story, kinda an icon, really. Yeah, she stole 'em. And apparently she was unashamed. But, to her grandkids, they will forever be known as....

Grandma Foster's Chocolate Squares

Melt 1/2 Cup butter in a saucepan, add 1/4 Cup Sugar, 1/3 Cup Cocoa, 1 tsp vanilla, 1 egg, 2 cups graham cracker crumbs, 1 Cup coconut and 1/2 cup chopped walnuts.

Press mixture into 12" X 8" pan or 9 X 9 pan. Set aside.

Cream 1/4 Cup butter, blend in 2 Tbs vanilla instant pudding powder, 3 Tbs milk, 2 Cups confectioners (powdered) sugar. Spread this over the chocolate layer.

In a microwave safe bowl, melt 3 oz of semi-sweet chocolate chips with 2 Tbs butter. Spread over cream mixture.

Chill (literally, and figuratively), then cut in squares.

Don't expect leftovers. Make another pan, and just don't take it. :)

Tuesday, December 21, 2010

Day 7 of 12 - Almond Poppyseed Biscotti


We live right down the street from Byer's Choice. If you don't know Byer's Choice, they are figurine and collectibles company that specializes in Carolers and other things. We are going into our 5th Christmas in this house, and while this factory is a 1/4 mile from my house, I've NEVER EVER been there! I threaten every year to visit their Christmas Museum. In order to make it happen this year, I decided to invite a couple of my other homeschooling families to tour the museum and factory, and come back here for hot chocolate and cookies.

I'm a huge, huge fan of biscotti! Perfect for dipping in tea, coffee, hot chocolate, etc. I do recommend dipping, because it's so crunchy that you might just break a tooth! Well, if you have weak teeth like mine, you would! I've altered this recipe a little to suit MY needs. I added the poppy seeds - but you can definitely make it without if you want a strictly Aldi recipe. It's delicious, and it would make a great gift as well.

So, while the kiddies are drinking hot chocolate and downing chocolate chip, peanut butter and ultimate snickerdoodles, the ladies and I will be dipping our biscottis in tea!

:) Enjoy!!!

Almond Poppy Seed Biscotti

1 Cup Southern Grove Raw Almonds (purple bag), chopped
1 tsp Baker's Corner Baking Powder
1/8 tsp Sebree salt
2 Cups Baker's Corner Flour
3/4 Baker's Corner Sugar
3 Large Golden Hen Eggs
1 tsp Stonemill Classics Vanilla Extract
1/2 Tsp Stonemill Classics Almond Extract (only available this time of year)
1 Tbs Poppy Seeds (not available at Aldi - but I got mine at CVS for .99)

Preheat oven to 300, line a baking sheet with parchment paper.

In a small bowl, mix together eggs and extracts and set aside.

In the bowl of a mixer, mix together flour, sugar, salt and baking powder. Slowly add egg mixture. Pour in almonds and poppy seeds.

Turn out onto a counter and form into two long thin log. Place on parchment paper. Bake for 30-40 minutes. Remove from oven and let cool on wire rack for about 10 minutes.

Transfer logs to cutting board and cut into 1/2" slices on the diagonal. Arrange evenly on a cookie sheet. Bake 10 minutes, flip over, then bake 10 minutes more or until firm. Allow to cool completely and store in an airtight container.

Monday, December 20, 2010

Day 6 of 12 - Almost Chocolate Wonders


A friend, and subscriber to my blog, makes these wonderful treats called "Chocolate Wonders". Now, technically, these are also called Haystacks. I believe the story goes that someone gave them a gift of Haystacks, but when her husband tried them, his response was "What are these Chocolate Wonders?" (Jennifer - please correct me if I'm wrong on the story!). The original recipe calls for chow mein noodles, which are not sold by Aldi. Well, not until Chinese New Year time rolls around! So, to keep this as close to Aldi as possible, I replace the chow mein noodles with broken mini pretzel pieces.

They are delicious, and they are wonders, but until Kevin tries them, I won't know if they officially pass! I also altered the level of chocolate chips and butterscotch chips because of the consistency called for it.

These would make wonderful (no pun intended) gifts!

Almost Chocolate Wonders

1 Cup Baker's Corner Chocolate Chips
1 Cup Baker's Corner Butterscotch Chips
1 Cup Southern Grove Unsalted Peanuts
1 Cup Clancy Mini-Pretzels, broken up

Melt chips in microwave in 30 second intervals until melted and smooth. Stir in peanuts and pretzel pieces. Drop on wax paper covered cookies sheets using a teaspoon. Place in refrigerator or freezer until firm. Serve. Eat. Hide them so no one else can eat them.

Sunday, December 19, 2010

Day 5 of 12 - Ultimate Snickerdoodles


Okay, so.....I'm knee deep in baking. I took a little break yesterday to watch my oldest in her gymnastics meet, and the evening off to enjoy a date with hubby. We went to dinner at a friend of his house, the company and dinner was amazing. I'm hoping to get some of the recipes to share here on the blog. Dinner was, in short, amazing. :)

Well...after resting all day, I'm back to baking. I bake quite a few kinds of cookies for the holidays. My husband likes to take a tray to work to spoil his co-workers, and in recent years, likes to take them to his cigar shop buddies.

This cookie is my personal favorite, it's a snickerdoodle BUT it's jacked up a little with cinnamon in the batter as well as on the outside.

I hope you enjoy!

Ultimate Snickerdoodles

Batter:
2 sticks Country Creamery Butter, softened
1 1/2 Cup Grandma's Best Sugar
2 Golden Hen Eggs
2 3/4 Cup Grandma's Best Flour
2 tsp Cream of Tartar * (not at Aldi :( )
1 tsp Baker's Corner Baking Soda
1/4 tsp Sebree Salt
1 Tbs Cinnamon

Sugar mixture:
2 Tbs Spice Club Cinnamon
1/4 Cup Grandma's Best Sugar

In a large mixing bowl cream butter, sugar and eggs until fluffy, scraping sides of bowl occasionally. In a separate bowl, combine flour, cream of tartar, baking soda, salt and 1 Tbs cinnamon. Mix well. Add slowly to creamed butter mixture. Mix until well blended.

Refrigerate dough 30 minutes.

Preheat oven to 375 degrees.

In a small bowl, combine remaining sugar and cinnamon and mix well. Roll dough into about 1" balls and roll in cinnamon sugar. Place on a cookie sheet about 2" apart. Bake about 10-12 minutes until golden brown. Remove to cooling rack and cool about 10 minutes.

The cookies will puff at first, and then flatten during baking. :)

Friday, December 17, 2010

Day 4 of 12 - Christmas Cookies


Okay, I'm cheating here a little bit. Just a little. This is borrowed from an earlier post...but used a different way. So, hoping that you won't be too upset with me and will let it count!

I tried, in vain, several ways to make these "cut out" cookies, but the dough was too soft, and was having no parts of being cut in any way. It much preferred being rolled into little balls and baked. :) Well worth it. The kids and I still had a blast frosting and decorating them today. Christmas memories, that's all I really care about. 20 years from now, they are not going to remember that these cookies were just circles. They'll remember Mom was with them, we did something fun together, and that they loved the cookies when they were done. I'll remember that I had moments with the 3 greatest gifts I've ever received. My children.


Christmas Cookies

1 Box Baker's Corner White Cake Mix (.89)
2 Eggs (.11/ea)
1/3 Cup Oil (.20 - sells for 2.29/quart)
1 container White Frosting (1.19)
1 container baker's Corner Holiday Sprinkles ($2.99 for a 6 way canister - but you use VERY little)

Preheat oven to 375.

Mix cake mix, eggs and oil together with an electric mixer. Mix well. Shape into 3/4" balls and place about 2" apart on a cookie sheet. Bake for 6 to 8 minutes or until they are puffed and golden.

Allow to cool completely.

In a microwave safe bowl, melt about half of the frosting. Gently spoon about a teaspoon and spread around on the top of each cookie. Immediately after, add sprinkles. When the frosting runs low, warm up the other half.

They taste DELICIOUS. And if you want an easy way of making Snickerdoodles, skip the frosting all together, but roll in cinnamon sugar before baking.

Thursday, December 16, 2010

Day 3 of 12 - Cranberry Pecan Bark


I've been experimenting with candies this year (can you tell???), so I thought about what I'm going to give friends and such. I usually give some sort of food gift. I also make a cookie tray for my husband's work, and his cigar shop buddies. I thought it'd be fun to decorate with some homemade candies too.

This was a "using up" of ingredients I've used in other recipes (or will use, as we get closer to Christmas, I'll post my Cranberry Sausage Stuffing....so I'm saving some of the dried cranberries for that!).

This is an adaptation of an Ina Garten aka Barefoot Contessa recipe, using only Aldi ingredients of course!

Once broken in bits, it would looks so nice in a little candy box...

Cranberry Pecan Bark

4 bricks Baker's Corner White Almond Bark (.80)
2 Tbs. Southern Grove Chopped Pecans (.50)
2 Tbs. Southern Grove Dried Cranberries (.50)
1 brick Baker's Corner Chocolate Almond Bark (.20)

Chop white almond bark into small pieces, melt the in microwave in 30 second intervals until smooth and melted (stirring after each break). Pour chocolate onto wax paper lined cookie sheet and spread out to about 8 X 10 rectangle. Immediately sprinkle chopped pecans and dried cranberries on top.

In a separate microwave safe bowl, melt the 1 brick of chocolate almond bark the same way you did the other. Drizzle over the white bark.

Allow to set before breaking into bite sized pieces.

Wednesday, December 15, 2010

Day 2 of 12 - Grandma Normie's Apple Cake


(day late, dollar short - tomorrow I should have TWO recipes for you!)

Well, the holidays are fast approaching, and the household is buzzing. The tree is up (and even decorated!), the lights are outside, the stockings are hung over the fireplace, the Nativity is on the mantle. The countdown begins!

I love how Aldi obliges this time of year and gathers together the greatest, yummiest and easiest ingredients to make super cookies and confections! I had a hard time containing myself on my last shopping trip!!!! All the types of chips and chocolates and nuts and dried fruits, oh my.

One of my favorite memories of Christmas is baking cookies in my Grandmother's kitchen. Christmas began and Grandmom's and ended at Grandmom's. Christmas Eve started at church where I sung the Christmas Carols in the children's choir, then it was off to the nursing homes in the area to sing and bring cheer, then back to church for the midnight services. We were always allowed to open one gift on Christmas Eve, and it was always our ornament from Grandmom. She was always so good at picking something that really represented that year. Then we'd vainly tried to sleep while waiting for the sounds of Santa and his sleigh on the roof. I always fell asleep before I heard a thing. Grandmom would get up Christmas morning before we did - I always suspected that she loved the magic of Christmas morning even more than we did, we weren't allowed down the stairs unless the tree was lit, and the smell of coffee and breakfast was filling the air. And she was always downstairs at the crack of dawn, donned in her apron slaving over the bird.

This year is very bittersweet for me as we moved my Grandmom into an assisted living facility in April. She turned 87 this year in July. The transformation in her countenance since moving in there is remarkable. She is colorful and full of life again, she's even flirting with the gents. The only thing she misses, she says, is her kitchen.

My grandmother's kitchen was a magical place at Christmas time. I can still smell the burning oil of the motor and the bakealite cord of her Kenmore mixer, I can still hear it whirring away while creaming the butter and the sugar (a crucial step in most holiday baking!) Of course we made Chocolate Chip. Gotta be honest, I don't remember making any other cookie!!! I'm sure that we did, because it is hard for me to believe that my Grandmom with her many talents was a one-trick pony. But, I can't bake or eat a chocolate chip cookie without thinking of her. And well, we also need to face the fact that Aldi's got a pretty darned good recipe for these on the back of their chocolate chip bag, so it'd be kinda pointless to do a chocolate chip. So, the other thing I always remember making was the apple cake. Hours slaving over peeling apples are another memory of the kitchen. She sang the whole time. I believe that we baked at least a dozen of these leading up to Christmas Eve, possibly even more. It was a tradition that my mother kept up, and now, in her passing, my stepfather. Dense, rich, chewy, appley, delicious. It calls out to be eaten with tea, or coffee (sorry, can't stomach the stuff!), or even hot chocolate. We always called it "Jewish Apple Cake", but I'm not even sure why, and Gram can't remember either (well, she IS 87).

Grammy - this one's for you, I love you. Merry Christmas.

Grandma Normie's Apple Cake

3 Cups Grandma's Best Flour
2 Cups Baker's Corner Sugar
1 Tbs. Baker's Corner baking powder
1 tsp. Sebree Salt
1/4 Cup Happy Valley Orange Juice
4 Golden Hen Eggs
1 Cup Carlini Vegetable Oil
2 1/2 Tbs. Baker's Corner Vanilla

Apples:
5 medium to large apples
1/2 Cup Bakers Corner Sugar
2 tsp to 1 tbs Spice Club Cinnamon (or to YOUR taste)

Preheat oven to 375.

Peel, core and slice apples into sections - should get 12 sections per apple. Cover with sugar and cinnamon and marinate while preparing the rest of the ingredients.

In a large bowl combine dry ingredients. Add eggs, orange juice, oil and vanilla and mix well. If too dry, add more orange juice. The batter will be very thick...but you should be able to stir it!

Prepare a 10" Tube pan by buttering & flouring the sides (or using the Carlini baking spray which has both oil & flour already).

Pour about half of the batter into the prepared tube pan and top with about half of the apples, add remaining batter, add the rest of apples (if it looks like there's too many apples, you can hold some back....I prefer it with SOME apples, but not overflowing - my mom used to us 7 or 8 apples and you barely had enough cake to hold it together! but that's how she liked it! - my version is more to my Grandmother's actual recipe).

Bake for 2 hours. After about 1 hour to 1 1/2 hours, make sure to loosely cover top with foil so that the top does not burn.

Remove from tube after about 10 minutes. You can leave on the base until ready to serve.

It is best enjoyed with tea or coffee.

Monday, December 13, 2010

Day 1 of 12 - Mock Turtles


The official kick off of 12 Days of Christmas Recipes begins today. It had to begin with a favorite of mine, it just had too. :)

I've been trying to find a way to Aldify this recipe for about a year now. I think I've done it, but I've called it Mock Turtles instead of Turtles, because, well....you'll see!!!

They're a little gooey, a little sweet, a little crunchy and a little salty. They are also, a little messy since the chocolate covered caramels available at Aldi have a slightly creamier caramel than a Rolo would. :) But...even though they are a little messy, they are well worth the time, effort, and wait for cool down.

Even though I used the paper mini-cupcake liners, I recommend using the tin-foil ones...I believe they will release more easily, and the oils won't soak into the paper.

Mock Turtles

24 Clancy's Mini Pretzels (.10)
24 Chocisserie Chocolate Covered Caramels (2.49 for bag of about 35 - so I'm going to say 2.00)
24 Pecan Halves (2.49/bag right now! - and you only use about half - so 1.25)

Preheat oven to 275.

Line a mini-muffin pan with foil mini-muffin cups. Break a pretzel up into the bottom of each cup. Unwrap and place a chocolate covered caramel over pretzels.

Place in oven for 5-7 minutes - or until the caramels seem glossy and oozy. (that's a culinary term!)

Remove from oven and immediately press one pecan half in each cup over the melty caramel. Let cool approximately 24 hours before attempting to eat! I swear! You'll be in for a mess if you try any sooner. :)

They work out to be about .14 each - which, again, is still cheaper than Godiva

P.S. Packaged in a pretty box or bag, these make wonderful gifts!

Tuesday, December 7, 2010

Chocolate Cheesecake Truffles


I am a part of an online Homeschooling community. This year we decided to host a virtual cookie exchange. Each mom is adding a tried and true holiday recipe. This one was added by MamaKittyCat. Hers were officially titled "Oreo or Nutter Butter Truffles". And while they are very truffle like, I used neither Oreos or Nutter Butters (partly because I refuse to pay full price for something I can get cheaper at Aldi!!!).

I retitled them after tasting, and my kids agreed, they have much more of a Cheesecake taste. I decided then not to name them after the cookie used, but after what they tasted most like. :) Feel free to substitute the cookie with a preferred creme cookie of your choice (make sure to only use about a lb of cookies, though so that you get the right texture for the inside). I would very much like to try these with a peanut butter creme cookie....I might do that soon!!!

Cheesecake Truffles

8 oz Happy Valley Cream Cheese (.89)
Benton's Duplex Sandwich Creme Cookies (1.49)
Baker's Corner Almond Bark (1.99) (I used both white and chocolate - these are only available this time of year)

Remove 14 cookies from the package and eat like a piggie (no, seriously, set aside to eat another time...you only need about a lb of the cookies).

In a food processor, pulse cookie in batches into fine crumbs.

Combine cooking crumbs and softened cream cheese until very smooth. (I used my KitchenAid Mixer on 4 until it was a very thick, smooth batter).

Roll into about 3/4 to 1" balls.

Melt 4 bricks of your choice of almond bark coating. (I used 4 bricks of chocolate, and 4 bricks of white in separate bowls). You will have a lot of leftover chocolate bark to use for other projects - some will be forthcoming on this blog! :)

Roll the truffles in the melted coating and set on a wax paper lined cookie sheet until the chocolate sets. We also sprinkled a little bit of sprinkles on some, and on others I dipped in the chocolate and then drizzled the white bark over top.

This makes about 48-60 truffles depending on size.

Due to the fact that you have cream cheese in them, I do recommend refrigerating. Oh...and btw...they cost about 6 cents each - so - a lot cheaper than Godiva (and better tasting in my opinion!!!).

Monday, December 6, 2010

Coming soon....

....I'll be counting down the last 12 days to Christmas with recipe each day for holiday enjoyment!

Each one will be a memory, old and new.

Whether you celebrate Christmas, Hannukah (which by the way I hope you're enjoying!), or Kwanzaa....I hope you tune in for the treats!

Thursday, November 18, 2010

Pumpkin Muffins


I absolutely love this time of year. The crunch of the leaves in fall, the colors, the anticipation of the coming season. I know for many, Christmas is their favorite holiday. I can honestly say that, for me, Thanksgiving is even greater.

We have a tradition where we travel to Michigan to visit my husband's stepmother. The past couple years, instead of cooking, we've gone to the Thomas Edison Inn for dinner. It's so nice, to have some one else cook, have some one else clean, and just to be able to focus on the ones you love. As much as I was just a little worried about it the first year, I'm so grateful that it's become our tradition. So relaxing and fun. I also love the 2nd day, Black Friday to most of you nuts. To us, it's Frankenmuth day. For those of you who are not from, near, or have never been to Michigan, Frankenmuth is Michigan's Little Bavaria. It is like stepping into a German town. All buildings have the Bavarian architecture, most of the waiters and waitresses in the restaurants wear laderhosen (sorry if I butchered that). And, well, it's just a wonderful day. Our stops include Bronner's, the worlds largest Christmas store (picture 3 Home Depots); The Cheese Haus; and The Bavarian Inn, where we gorge ourselves on the best chicken dinner available in the world! We also manage to take a horse drawn carriage ride around the city every year. And if we time it right, we drive through the town just after they've lit the lights for Christmas. And lets just say, they go ALL OUT. Sigh. We leave next week. And I'm so excited.

Another great thing about this time of year is that Aldi starts to stock their shelves to the gills with all the holiday necessities! Canned Pumpkin, Whole Cranberry Sauce, French Fried Onions, Turkeys, Hams and the like. All at wonderful prices. They also have special treats, giftables and toys at very reasonable prices. I try to stock up on things I know I'll use all year long.

Okay, back to the muffins. As I sit here typing, they are baking in the oven. My house smells like pumpkins. It smells like Thanksgiving. It takes me to the people I love, and the places I love to be. I hope it does the same for you, no matter where you are. I really wish you could smell my house right now.

To give credit where credit is due, this is NOT my personal recipe. It was given to me from a friend on a homeschooling forum named "Monkey Mama". It's actually a pumpkin bread recipe that I adapted to muffins so that it'd be easier to take on our road trip.


Pumpkin Muffins

5 Golden Hen Eggs (.89/dozen this week! so... .37)
1 1/4 Cups Carlini Canola Oil (.72)
1 15 oz Can of Baker's Corner Pumpkin (.79)
2 Cups Grandma's Best Flour (.50)
2 Cups Baker's Corner Sugar (.50)
1 tsp. Baker's Corner Baking Soda (.05)
2 tsp. Spice Club Cinnamon (.03)
1/2 Tsp Sebree Salt (.01)
2 3oz packages of Baker's Corner Vanilla Pudding (.75)

Preheat oven to 325.

In a large bowl, beat the eggs. Add oil and pumpkin. Beat until smooth. Combine remaining ingredients in a separate bowl and mix well. Gradually beat into the pumpkin mixture.

Pour into prepared muffin pans (you can either spray well or use muffin liners, I use the liners! Makes travel easier!).

Bake for approximately 30 minutes or until a toothpick inserted into the center comes out clean.

This makes approximately 30 muffins at .13 each! :) ENJOY. They're fairly sweet, but if you like a little frosting, you could melt about 2 tablespoons of the Baker's Corner Vanilla Frosting in the microwave and drizzle over top. :)

BTW...they freeze and travel very well! :)

Sunday, October 24, 2010

Harvest Hayride Breakfast


a.k.a. Pumpkin Waffles with Apple Cider Syrup.

I have this really great friend who gave me a used waffle maker. I just got it about two months ago, and I've been experimenting with waffles, mixes, etc.

Imagine my surprise when I walked into Aldi the other day and saw Millville Pumpkin Pancake & Waffle Mix. And in the refrigerated section near the orange juice was Nature's Nectar Apple Cider. Of course, light bulbs start going off in my head, and my mouth starts watering, and I do believe I drooled - just a little bit (no one saw, at least I don't think they did). Oh well, even if they did...wasn't going to stop me from having my "Fall on a Plate".

So, this recipe is ONE PART review of a seasonal Aldi Product, and a recipe using another seasonal product. Stock up while you can! You won't regret it.

Pumpkin Waffles - follow package directions. $2.79 for a box which makes about 9-10 6" waffles.

The waffles were VERY easy to make, smelled delicious baking in the waffle maker, and turned out crispy on the outside and fluffy on the inside. Very nice taste and texture.


Apple Cider Syrup

2 Cups Apple Cider ($2.39 for 56 oz)
3 Cups Brown Sugar
2 Tbs Butter
1 tsp cinnamon (or if you have on hand, float a cinnamon stick while cooking)
1/2 tsp vanilla

Bring all contents to a boil on the stove. Reduce heat and simmer until thickened. Allow to cool slightly before serving. This makes about 24 oz of syrup. So it makes A LOT. :) And it's only about 5¢ a serving!

Wednesday, October 6, 2010

Raspberry Breakfast Treats


So. I haven't been around much. For that, I'm TRULY sorry. But...life has gotten quite busy here. School has started, and being a homeschooler, it takes much of my time! And my daughter's gymnastics season has now started...and being the wonderful mother that I am, I took over the Concessions and food for home meets. Last week was my first ever meet. It was my daughter's first meet of the season. It was a great day all around. And it's been so fun planning, buying, making, getting ready, etc. A whole new adventure for me. I have an incredible team of ladies that I'm working with, who were incredible for this first meet!

My focus lately has been in trying to find inexpensive things to make that would be easy for the Judges or Coaches to eat at a meet. This evening, I tested something that I've been dreaming about for weeks. So...here goes.

Oh...btw...if you're dieting...DO NOT, I REPEAT, DO NOT MAKE THESE!

Raspberry Breakfast Treats

1 Tube Bueller's Crescent Rolls (1.39)
8 tsp. Berry Hill Raspberry Spread (2.39/8 oz - .50)
2 Tbs Baker's Choice Vanilla Frosting (.99/12 oz - .10)

Preheat oven to 375.

Open and roll out tube of crescent rolls. Separate into 8 triangles. Spoon about a teaspoon of Raspberry Spread in the widest part of the triangle, spread down to about halfway down. Roll into crescents and bake according to package directions.

Allow to cool.

Heat frosting in microwave for 10-15 seconds and drizzle over crescents.

Sit down, enjoy with a cup of coffee, tea, hot chocolate, pretty much, anything!!! Only 25¢ each!!!

Thursday, August 26, 2010

Zucchini Bread

For those of you with green thumbs, and over abundance in your garden, wanting something to do with all that zucchini that is growing like weeds...this recipe is for you.

I, however, have a black thumb and kill everything I try to grow save children and a larger waistline. I have to buy my zucchini from Aldi. Thankfully, it is so reasonable! A few weeks ago I got 3 good sized zucs for $1.39!!! WHAT? Okay, not as good as free - but easier than me trying to garden (and far less amusing to the outsider!) And they were fine specimens too, large and quite weighty! I still have one left after making this treat!

Also, there is no picture because it did not last long enough to be photographed. I briefly considered taking a picture of the mangled aluminum foil with crumbs abounding, but figured that would be cruel. :)

I hope that you enjoy.


Zucchini Bread

3 Golden Hen Eggs (.25)
1 Cup Vegetable Oil (.40)
2 Cups Baker's Corner Sugar (.20)
2 Cups Grated Zucchini, drained well (about 2 med-large) (.93)
1 Tsp Vanilla (.10)
1/2 Tsp Sebree Salt (.02)
3 Cups Grandma's Best Flour (.50)
1/2 Tsp Bakers Corner Baking Powder (.02)
1 Tsp. Baker's Corner Baking Soda (.01)
3/4 Teaspoon Spice Market Ground Nutmeg (.01)
1 Tbs. Spice Market Ground Cinnamon (.02)

Preheat oven to 350 degrees.

Mix eggs, oil, sugar, zucchini and vanilla together well in a very large bowl.

Sift together salt, flour, baking powder, baking soda, nutmeg and cinnamon.

Mix dry ingredients into wet ingredients. Stir well, but do not overmix.

Pour into two 8 X 5 (or 9X5) loaf pans. Sprinkle the top with a light coating of sugar, if desired (this makes for a crispy top crust!) Bake for 45-55 minutes - or until top springs back. Let cool completely before removing and slicing (this will be tough I realize!)

The cost is $1.23/loaf - and that means about .12 a slice! Tasty, inexpensive treat! :)

Wednesday, August 11, 2010

Chinese Cabbage & Eggs


DO NOT BE AFRAID TO TRY THIS!!!

For the last few years we've been blessed with the opportunity to host Chinese Cultural Immersion Students. It's always such an enriching experience for us as a family, and for me personally. The gist is, they come here for "American Camp" and visit a few typical American cities (she's been to Las Vegas, Los Angeles & Philadelphia, and after she leaves us will spend a few days in NYC), they also live with American families and immerse themselves in the language and the culture. She's been here almost 2 1/2 weeks already. They do typical "American" things, tour our schools, firehouses, farms, etc. And learn about American culture. As well as sharing their own with us. The students spend half the day in class learning about America, then they spend the other half of the day on a field trip. As a host family, we get to attend as many of the field trips as we like. We've done quite a few with this group this year! But, one of my favorite parts of this exchange is that usually they teach me how to make an authentic dish or two while they are here.

This year, our student Ya Xian (yah sheeahn), aka Angela is 14, and a true delight. Ya Xian has an English name, Angela, because we Americans are complete doofuses when we try to pronounce Chinese names. I'm not kidding, you haven't lived until you've had 20 Chinese teenagers laughing at you trying to pronounce their names!. Angela and her classmates are from a town about 45 mins south of Hong Kong. They are definitely more like American teenagers than we've experienced before. She came with a laptop, MP3 player and cell phone. She texts with one hand - now the keyboard on her phone is English alphabet, when she types on the screen, though, it's in Chinese characters! WHAT??

I might be a little biased, but, we've got the best student on the trip! What strikes me about her character is that she, unlike most female Chinese Immersion Students we've encountered, is not afraid of anything! She was the first (and only) of the girls to swim during our welcome party, she's tried fishing, she walked barefoot in the creek and threw rocks with us, she's tried on a fireman's suit, she's played American games even though she didn't know the language well, she's played in the rough waves of OCNJ. Not only that, but she lets me take her picture! I'm surprised she's not blind from all the pictures I've taken. All the other girls hide from me when I bring out my camera and say "no, no, I'm ugly!" Not Angela, she turns towards me and smiles broadly. She's just great! Her bravery, and courage when facing new things is truly inspiring. She seems to have a true sense of who she is, and how valuable she is to her family, and this world. I am slightly concerned, however, that my youngest is going to stow away in her luggage and run away to China with her. They've gotten quite close. Here is our Angela:


Anyway, I digress, not to be one to shy away from a challenge, Angela wanted to cook dinner for us. Her father gave her a recipe and told her - over Skype, of course - how to prepare it (I want you to keep in mind that she NEVER cooked this recipe before, nor is it something she has at home often....I told you, BRAVE!). Tonight was the night. She prepared one batch and we ate it so fast, she had to teach me how to cook the dish and we ate the 2nd batch down equally as fast. Inhaled would be a better word. As odd as the words cabbage and eggs might sound in the same recipe, but PLEASE try it, I know that you won't be disappointed.

Oh, and the bonus? Not only is it delicious, but it is CHEAP!


Chinese Cabbage and Eggs

1/2 head of cabbage, shredded (.85)
3 eggs (.30)
Salt & Pepper to taste (.01)
1-2 Tbs Oil (.10)

In a small bowl, mix eggs with pinch salt & pepper.

Heat oil in large skillet or Wok over medium heat. Add cabbage and saute until tender crisp. Add a pinch of salt.

Add egg mixture and cook until eggs are fluffy and cooked. Sprinkle top with pepper. Serve immediately.

Aside from chopping, cook time takes about 5-10 minutes all told. Seriously EASY supper for 32 cents a serving!

* If you need to make more, I suggest making it in two batches so that the cabbage sautes and doesn't steam.

Wednesday, August 4, 2010

Suicidal Blondies


Okay, so maybe they're not suicidal, but they are definitely depressed. They wish they were chocolate brownies, but what they don't understand is that they're awesome, just the way they are. I do know that a few delicious, inexpensive ingredients gave their lives for them to be so delicious. I think it's only fitting, and honoring, to eat them with gusto, and a glass of milk. And be thankful!!!

Feel free to eat these in excess (i.e. INXS).

Suicidal Blondies

1 Cup of Country Creamery butter, melted ($1.00)
2 Cup of tightly packed dark brown sugar (.45)
2 Golden Hen eggs, lightly beaten (.20)
1 teaspoon of vanilla (.10)
1 teaspoon Bakers Corner baking powder (.05)
1/2 teaspoon of Baker's Corner baking soda (.05)
1/4 teaspoon of Sebree salt (.01)
2 cup of Grandma's Best all-purpose flour (.50)
1 package of Baker's Corner Semi-Sweet Chocolate Chips (1.69)

Preheat the oven to 350°F.

Lightly butter and flour an 13 X 9 pan.

Whisk together the melted butter and sugar in a bowl. Add the egg and vanilla extract and whisk until smooth. In a separate bowl, mix together the flour, baking soda, baking powder, and salt. Add to the butter/sugar/egg mixture and mix well. Add the chocolate chips and mix well again.

Pour into the pan and spread evenly. Bake for 35-40 minutes or until a toothpick comes out clean.

Allow to cool. (if you can handle it!!!)

Cut into squares and serve.

Makes 18 blondies @ .23 each!

Tuesday, July 6, 2010

SALES ALERT!

Hey everyone...I was in my local Aldi the other day and picked up the new flyer! I'm sooooo excited!!!!

A large variety of Fit & Active products will be coming back to the stores starting July 14th. Shakes, Egg whites, low sodium bacon, and snack bars just to name a few!

Also, Sundae Shoppe Juice Bars are coming! $1.99 for 12. These are the like Minute Maid push-popcicles. But cheaper. And, well, in my opinion, tastier! :)

ENJOY SHOPPERS!

Friday, July 2, 2010

I PROMISE more recipes are coming...

School is over, portfolios turned in. First gymnastics camp is almost done....cooking will commence!

I've been working on a few recipes to share, for sure....I even took pictures of them, I just need the 10 minutes it takes to type up the recipes and get them into the computer!

The most exciting Aldi News I can share right now is that Aldi has started selling FRESH Chicken! YAY!!!! Boneless Skinless Breasts for $2.59 a lb! WOW. Also, they have a good selection of bone-in legs and breasts and thighs. Truly become a one stop shop for me now!

Be on the lookout for some recipes using these newly available items!

:)

Monday, June 14, 2010

Stuffed Pepper Rings


Last week, I IM'd with my husband at work. I was trying to figure out, yet again, what to have for dinner. He was craving Stuffed Peppers, but I didn't have the ingredients. I haven't been able to get it off my mind since then, so here goes!!!

Stuffed Pepper Rings

1 package Green Peppers (2 in a package) (1.69)
1 package Multi-Color Peppers (2 in package, usually 1 red one yellow) (1.99)
1 20 oz package Fit & Active Ground Turkey ($2.49)
1 cup cooked rice (I used from leftover Chinese Takeout from the night before) (.25)
1 egg (.10)
2 slices whole wheat bread, crust removed (.20)
Milk (just enough for bread to soak up) (.20)
1 28 oz Jar Reggiano Spagetti Sauce (1.09)
Salt
Pepper
1 Tbs Garlic Powder (.08)
1 Tbs Onion Powder (.08)
1 Tbs Italian Seasoning (.08)
8 oz Happy Farms Mozzarella Cheese Block, shredded (1.79)

Preheat oven to 350 degrees.

Prepare peppers. Cut tops and bottoms off, then cut at least two rings out of each pepper (about 1" tall). Using caution, cut seeds and membrane out of rings. Set aside.

In a small bowl, place bread slices. Cover with milk and set aside.

In a large bowl, add ground turkey, rice, egg, garlic powder, onion powder and Italian seasoning. Add soaked bread and milk. Mix together well.

Place a small amount of the spaghetti sauce on the bottom of a 13 X 9" baking pan. Spread out. Lay rings evenly in the pan. Scoop meat mixture and press into each of the rings. Cover stuffed rings with the remaining spaghetti sauce. Bake, covered in foil, for about 30 minutes. Remove foil and bake 15 more minutes. Add shredded mozzarella cheese the last 5 minutes.

Let stand about 5 minutes before serving. Enjoy this with a green salad and garlic bread!

I would say that this serves 6 (it served us, a family of 5, with leftovers) making it $1.64 per serving. There are ways you could make this a little less expensive per serving, also. Using the ground turkey in the tube for .99/lb would reduce it. Also, check for peppers more in season, or use all green peppers would also reduce the cost.

Monday, June 7, 2010

Zucchini Pancakes


I know. I haven't been around in a while. Life has been just plain crazy around here! Dinner has been from the 4 OTHER food groups: Order In, Take Out, Frozen and Canned. :)

FINALLY, I got to cook something. Something I've been dying to try, actually. I think I was watching a show on Food TV when I started drooling (of course, isn't that how it always starts????). I've had to adapt, of course, to Aldify it. But, the end result was just plain delicious. :)

I love zucchini. I didn't always love zucchini. When I was a child, I ate like a child and didn't like it. I was 21 before I had zucchini in a way that just was delicious. I have since that time loved all things zucchini and have tried many different things. These are YUMMY. I hope you enjoy. And if grow your own, or have a Mom who does, all the better!


Zucchini Pancakes

2 large zucchini, grated (1.39)
1 cup Baker's Corner All-Purpose Baking Mix (.20)
1/2 medium onion, diced small (.30)
2 Golden Hen eggs (.20)
2 large cloves garlic, minced (.10)
1 tsp Spice Club dried Parsley Flakes (.05)
Salt and freshly ground black pepper
1/4 cup canola oil (.40)
1/2 cup sour cream, for serving (.20)

Directions
Grate the zucchini. Place the grated zucchini in a clean kitchen towel and squeeze well to remove the excess water.

In a large bowl combine the zucchini, baking mix, onion, eggs, dried parsley and garlic and season with salt and pepper, to taste. Mix well to thoroughly combine. Let sit about 15 minutes (this allows the parsley to soak up some liquid and not have the "dried" texture).

Heat the oil in a large skillet over medium heat. I used my cookie scoop to make consistently sized pancakes. Place in the oil and flatten slightly. Cook about 2 minutes on each side. Move cooked pancakes to paper towels to drain. Makes 12-14 pancakes.

Serve warm topped with a dollup on sour cream.

.48/serving....cheap tastes good!!!

Monday, May 17, 2010

Grilled Pork Loin w/ Grilled Potatoes


I really cannot take credit for this recipe, simply because it's too easy. AND because, my husband did it. I am, admittedly, afraid of the grill. Whether it be the fire, the heat, the uncontrollable cooking (I AM a control-freak), etc. But, my husband is a grill-master extraordinaire. I do not joke. He can take an awful cut of meat and turn it into the most delicate, delicious grilled fare to be devoured. Um, I mean enjoyed!!!

Anyway, the Roseland Boneless Pork Tenderloins have always intrigued me. I've never cooked pork tenderloin before and was apprehensive. After I defrosted it yesterday, I realized the directions gave an option for grilling. And the weather was perfect for grilling. "Oh Honey.....how do you feel about grilling out tonight?" He jumped at it!!!


Grilled Pork Loin w/ Grilled Potatoes

1 Roseland Boneless Pork Tenderloin (they are 2.99/lb - mine was $4.10 and about 1.3 lbs)
1 Cup Fit & Active Light Honey Dijion Salad Dressing ($1.69/bottle)

Marinate pork loin for several hours in the salad dressing.

Heat coals on grill (or heat gas grill to med-high heat). Grill pork loin for 25 minutes in a covered grill, or until the internal temperature reaches 160. My husband did turn it a few times to make sure it got good "bark" on it.


Grilled Potatoes

4 Red Potatoes (about 1 lb - $2.49/3 lbs)
Olive Oil (about 1 tbs)
Salt & Pepper

Cut potatoes in half. Coat in olive oil, salt and pepper. Place potatoes cut-side down on grill for about 10 minutes, make sure grill cover is closed for cooking). Turn potatoes over and grill for another 15 minutes.

I added a salad made from garden-grown salad greens from my friend.

This meal serves 4 nicely, and only costs $1.45 per serving!!!

Sunrise Surprise!

Hello folks!

I know, it's been a while. Lets just say, 2 root canals, and tender gums and teeth had changed my diet drastically in the last few weeks! Factor in a crazy busy schedule, and well, food is catch as catch can.

BUT...will be more faithful. Things are STARTING to slow down, and even though my diet still looks like that of an 87 year old nursing home patient, I will be cooking more.

I thought I'd share an economical tip today.

As you know, Aldi's cereals are cheap, cheap, cheap. We don't do sugary cereals much in this house. The one exception being Vacation, I will buy the junk food cereals. Anyway, while shaking the plethora of boxes in my cabinet to prepare for my shopping trip yesterday (and erroneously thinking we had tons of cereal because there were at least 14 boxes in the cabinet), I realized that there was less than 1 serving in each box!!!! Not to be one to waste a buck, I combined them all into a fancy IKEA container and created what I call "Sunrise Surprise". All the interesting tidbits of leftover cereal created their own culinary heaven.

My two oldest ate it for breakfast today, and loved it!!!! Now they're going to be asking me to make this all the time, aren't they???

Thursday, May 6, 2010

An easy Mother's Day Breakfast...


Are you nervous? Mother's Day is SUNDAY! Did your order flowers? Send your card? NO? Well...wait....I have an Aldi Product Review that is VERY TIMELY!

How about make your Mom something delicious for breakfast?

I bought this, Breakfast Skillets, for $1.99 in the freezer section at my local Aldi. I chose the Sausage version because my family is partial to sausage. They also have Ham.

VERY EASY TO DO, add 6 golden hen eggs (they were 1.25 this week for a dozen!), and I added about 4 oz of shredded Happy Farms cheddar cheese.

For the most part, it was very yummy. The only comment from my hubby was that there were a lot of potatoes. I would add that the over-abundance of potatoes necessitated adding salt and pepper liberally. But it was overall yummy, quick, easy and very inexpensive!

Hope you enjoy!

And Happy Mother's Day to all you Mommies out there!

Wednesday, April 21, 2010

Aldi Peach Crisp


I think I've mentioned that when I'm stressed, I bake. Well, lately I've been under a considerable amount of stress. On Sunday night, I had to bake something.

This recipe harkens back to a peach crisp I made in OCNJ in 2006. My step-father had rented a house down in OC for us to have our vacation. During one of his visits to the shore house, he brought fresh Jersey peaches that were just perfectly ripe. And they were delectable! Of course, my stepfather being the generous man that he is bought about a bushel of them! There was no way to eat them before they'd go bad! So...necessity being the mother of invention, this recipe was born.

To Aldify (I'm working on adding this to the dictionary!) it, I had to alter the peaches, but it turned out really well.

Hope you try, hope you like it, and don't forget to add the whipped cream or the ice cream!


Peach Crisp

1 Can Fit & Active Peach slices in light syrup
1 Cup Millville Quick Cooking Oats
1/2 Cup Baker's Corner Light Brown Sugar
1/4 Cup Grandma's Best Flour
pinch of Sebree Salt
6 Tbs. Country Creamery Unsalted Butter

Open and drain peaches well. Pour in to a shallow 8" or 9" pie plate.

In a bowl mix together flour, brown sugar, oats and salt. Melt butter in microwave or slowly on the stove. Mix into flour/sugar mixture.

Sprinkle/spread this over the top of the peaches.

Bake at 375 for 30-40 minutes (until oat mixture is browned and crispy looking).

Allow to set for about 5 minutes before digging in!

NOTE: I'll come back later to add the cost, I need to dig out some receipts since some of the ingredients have been in my pantry a while!

Friday, April 9, 2010

Peanut Butter Cup Cake


You got your chocolate in my peanut butter!


You got your chocolate in my peanut butter?


I mean, really, is there a more perfect combination that chocolate and peanut butter? I LOVE BOTH. And if you knew me in person, this would be quite obvious when you see the size of my bottom. Oh well.

This weekend, we had dinner with good friends. No, great friends. No, family. LOL :) In this certain circle, I've been labeled the dessert goddess, and usually people secretly wish I'm bringing dessert, even if I don't say I will. In all fairness, these people were friends before I knew I could bake well...so they got to eat a lot of my experiments.

Baking for me is very cathartic. It's the only thing I want to do when I'm stressed out. I used to work at a REALLY high stress job (pre kids, and even part of it pre husband). I'd work 20 hour days, come home and bake for 3 hours before I could go to bed. My co-workers loved it because I would bring my baking creations in the following day. My one boss used to joke about finding ways to stress me out so that I would bake something to bring in. :)

This recipe is a conglomeration of a few recipes I'd tried in years past.

Peanut Butter Cup Cake

Cake:
1 Box Bakers Corner Yellow Cake Mix
1 1/4 Cups Water
3 Golden Hen Eggs
1/2 Cup Creamy Peanut Butter
1/3 Carlini Vegetable Oil (or Canola Oil)

Filling:

1/2 Cup Country Creamery Butter, softened
1/2 Cup Creamy Peanut Butter
1/4 Cup Friendly Farms Half and Half
2 to 3 Cups Powdered Sugar

2 Tubs of Baker's Corner Milk Chocolate Frosting

Pre-heat oven to 350 degrees.

Using and electric mixer beat all cake ingredients together. Start slow for 30 seconds until combined. Then beat for 2 minutes on medium speed, scrape sides as necessary.

Pour into two round cake pans with parchment paper cut to fit the inside. Bake 30-35 minutes, until a toothpick inserted into the center come out cleanly. Cool for 10 minutes. Using a knife, loosen cake from sides of pan, cool for 1 hour before proceeding.

Prepare Peanut Butter Cream Filling. Cream together peanut butter and butter. Add half and half. Add powdered sugar in 1/2 cup at a time until the frosting is creamy and thick and desired sweetness.

After cakes are completely cooled, gently cut each cake in half horizontally (you'll end up with 4 thin circles of cake). Spread half of the peanut butter filling between two of each circle of cake.

Top one cake with a generous helping of chocolate frosting. Place 2nd cake on top. Frost top and sides with the rest of the chocolate frosting.

Chill in the refrigerator for 2 hours or until ready to serve.

Monday, April 5, 2010

Aldi Springs Chicken


I LOVE Outback Steakhouse. I love a good steak, and good potatoes, and a good bloomin' onion! BUT, I LOVE their Alice Springs Chicken. A few years ago, for Mother's Day, my husband made a replica of it for me. It was just as good, if not better. And lets face it, who wants to lug all the kids to a restaurant, shell out $13.99 for a plate of chicken that you know you can make at home for a fraction of the price?

Tonight, for dinner, I tried my hand at Alice Springs Chicken, and so as not to steal the name, I've renamed it "Aldi Springs Chicken". I don't believe there truly is an Aldi Spring, but we can pretend for a delicious recipe, right?


Aldi Springs Chicken

1 1/2 lbs boneless/skinless chicken breasts (about 3 large or 4 small) ($6.49/2.5 lbs)
1 16 oz bottle Fit & Active Light Honey Mustard Dressing (1.69)
1 16 oz package Fit & Active Lower Sodium Bacon (2.49)
1 8 oz package Happy Farms Monterey Jack Cheese, sliced thin (1.79)

Place 1 cup of salad dressing and the chicken in a large resealable bag. Marinate for 4 hours or overnight.

Prepare bacon. I prefer to bake mine on a cookie sheet. This makes for easier clean up and it doesn't destroy the stove, either.

Grill chicken. I have a table top grill (like a George Foreman), but you could certainly grill outside or pan fry. Grill until ALMOST done - you don't want to overcook the chicken, and you will be baking it for a few minutes.

Move chicken to a baking dish or cookie sheet. Cover each breast with bacon (I find about 3 strips per breast works well, this will leave you a few left for snacking or BLT's tomorrow). Cover bacon with cheese. Bake at 350 until the cheese melts and chicken finishes cooking (about 5 minutes). Serve immediately with the remainder of the honey mustard dressing for dipping.

Serves 6 (cut the breasts in half if using 3 large) for $1.62 per serving. To keep with the steakhouse theme, serve with a baked potato and a wedge of iceburg lettuce, this adds only about .15 per serving! MUCH CHEAPER than going to Outback.

(I made my own honey mustard for dipping because I wanted to try my hand at it. I used a recipe from www.allrecipes.com, but did not use Aldi ingredients which is why I'm not sharing).

Friday, March 26, 2010

Philly Cheesesteak Pasta


Miss me? Sorry, life around here has been so unbelievably busy! Homeschooling 3 kids, trying to maintain (and failing miserably) a 4 bedroom house, working to get my grandmother into assisted living facility, playing taxi to my kids many activities, and climbing Mount Washmore on what seems to be a daily basis, well...I just have been slacking off in the cooking department.

The other day, I spent the day in the kitchen, cooking and creating a recipe that had been in my mind for weeks. I LOVE Philly Cheesesteaks. And if you live in Philly, the fight is Pat's vs. Geno's - usually. Of course, out here in the suburbs, we have plenty of GREAT places to choose from. Personally, I prefer one on an Amoroso's steak roll, using FRESH meat and REAL Provalone or American cheese - no Cheese Whiz for me (sorry Pat's). Lots of green peppers, mushrooms and onions.

I've been having a tooth issue which makes it very hard to chew. And as delicious as a cheesesteak sounds, the pain of chewing it is a huge deterrent (I know, I'm going to the dentist...I promise). So...pasta's soft! So here goes!!!

I do warn you, this is not any healthier than eating a true Philly Cheesesteak. I never claimed that ALL the food I made would be healthy. :) I hope you try it, and enjoy it.

Philly Cheesesteak Pasta

12 oz Reggiano Penne Pasta (.99)
1 Tbs. Country Creamery Butter (.05)
1 Tbs. Olive Oil (.11)
1 Box Philly Gourmet Sandwich Steaks (1.99)
10 oz box of White Mushrooms, sliced thinly (.89)
1 green pepper, diced (.80)
1/2 large onion, diced (.30)
2 cloves garlic, minced (.10)

Sauce:
2 Tbs Country Creamery Butter (.10)
2 Tbs. Grandma's Best Flour (.10)
1 8oz package of Happy Farms Provalone Slices, julienned (1.99)
8 oz. Great American Slices, julienned (3.49/lb - so 1.75 for half)
2 Cups Milk (.45)

Prepare Pasta as directed on package. Drain and set aside.

Preheat oven to 350 degrees.


In a large saute pan, melt butter and oil together over medium heat. Saute diced onions, diced peppers and sliced mushrooms together until tender/crisp. Add minced garlic and continue to cook until mushrooms are soft. Cut sandwich steaks in strips (I cut them in half, THEN in strips). Add to veggie mixture and cook until beef is cooked through. Drain as much fat as possible. Set aside.

In a large sauce pan, melt butter. Stir in flour and whisk for 2 minutes to cook out the "raw" taste of the flour. Add milk slowly. Bring milk just to a boil and reduce heat to simmer. Continually stir over low heat until the mixture thickens and coats the back of a spoon. Remove from heat. Stir in cheeses until melted.

In a large bowl mix together vegetables/beef, pasta and cheese sauce. Pour into a 13 X 9 Inch baking pan. Bake for 25-30 minutes @ 350 degrees until cheese sauce is bubbly.

Makes 12 servings @ $.80 each! Please enjoy responsibly (like add a salad or something to make it redeeming!)

Monday, March 15, 2010

Sausage Meatball & Gnocci Soup


The start of this soup was a knock off of an Olive Garden soup. Of course, it didn't have sausage in it. What actually happened is that I wanted to make the Olive Garden Soup knock off, but didn't read the recipe before I went to Aldi, so I didn't get all the ingredients right! Oh well. Sometimes accidents happen for a reason. And this, I think, was much better than any Olive Garden soup I could have had (sorry, OG...it's true).


Priano Potato Gnocci
1/2 of 1 lb package Roseland bulk sausage
1/2 of package of Ground Turkey
2 Golden Hen eggs
2 slices of L'Oven Fresh wheat bread
1/2 cup milk
1 Tbs Spice Club onion powder
1 Tbs Spice Club garlic powder
1 Tbs Spice Club Italian Seasoning
2 Tbs Carlini Olive Oil
2 large carrots, peeled and diced
2 large stalks of celery, diced
1/2 medium onion, diced
2 cloves garlic, minced
2 bay leaves
2 Tsp Oregano
1 quart Friendly Farms Half & Half
1 quarter Fit & Active Chicken Broth

In a large stockpot, add olive oil. Place heat to medium. Once the oil is warmed up, add carrots, celery, onion and garlic. Saute until onions are starting to get translucent. Add bay leaves, and oregano. Mix well.

Add Chicken broth and bring to a boil. Reduce heat to low, cover and simmer for about 10 minutes until the vegetables are soft.

Prepare the meatballs as follows: In a small bowl add bread, cover with milk and let sit and soak up the milk. In another large bowl, add ground turkey and sausage, two eggs, onion powder, garlic powder and italian seasoning. Once the bread is soaked with the milk, add bread and any leftover milk in the bowl with ground meats and spices. Mix well. Form into 1/2" - 3/4" meatballs.

Drop the meatballs into the simmering broth. Cover and cook another 15 minutes. Add the half & half and mix in well. Uncover. Add in Gnocci and cook until they are soft and cooked through - about 5 minutes.

Serve. And enjoy.

I'll add calculations later! gotta go find my receipts!

Friday, March 12, 2010

Okay, I can see you're all holding out for....

....chocolate.

:)

I'll try to bake you something special over the weekend. Okay????

Tuesday, March 9, 2010

Biscuit-topped Chicken Pot Pie


I know that I recently did a Chicken Pot Pie Stoup. Well, this one is ACTUAL Chicken Pot Pie. Made a little differently, so, I don't feel TOO repetitive! :)

I had some leftover grilled boneless/skinless chicken breast in the fridge from a grilled chicken pizza dinner I made the other night. The chicken was not from Aldi, but you could easily use their IQF Chicken. I'm basing my price per serving on using their chicken.


Biscuit-topped Chicken Pot-pie

2 Cups Cooked Chicken Breast meat, cubed ($6.49/2.5 lbs, this was 1 large breast) ($1.00)
1 Cup Season's Choice Frozen Peas, thawed (.49)
1 Cup Season's Choice Frozen Corn, thawed (.49)
1 Carrot, medium dice (.10)
1 Celery Stick, medium dice (.10)
1/4 medium onion, medium dice (.15)
1 garlic clove, crushed (.05)
1 Tbs olive oil (.15)
1 Tbs Country Creamery Butter (.05)
2 Tbs Flour (.10)
2 Cups 2% Milk (.45)
1 Chicken Boullion Cube, crushed and mixed into the milk (.05)
2 1/4 cups Baker's Corner Baking Mix (.43)
2/3 Cup Milk (.14)

Place a large skillet over medium heat. Add Olive oil and butter. Add diced onion, celery and carrots and "sweat" until just about soft. Add peas, corn and chicken meat and stir until warm. Sprinkle flour over vegetables and chicken and mix in well. Pour in milk laced with boullion. Reduce heat to low, bring to a boil and let simmer until sauce thickens.

While chicken & veggies are simmering mix and form biscuits according to package directions (you may use as "drop" biscuits and not form them, just drop on top)

Pour chicken and vegetable mixture into a deep dish pie pan - or another 2 quart baking dish. Place biscuits on top (or if dropping, drop in even amounts around the top of the pan.

Bake in oven for 8-10 minutes (until biscuits are golden brown and cooked through).

Serve immediately, and don't expect many leftovers! :) Made 6 servings @ .63 each!

Turkey Tacos


If you ask my oldest child any time of day or night what she would like to eat, she'll respond with a resounding "tacos". It is her favorite food. I've mentioned many times that we lived in Phoenix for 4 years. I credit Phoenix with my oldest's love of Mexican Food. She likes it all, but tacos are, by far, her favorite. If she could have tacos every day of the week, she would. For both lunch and dinner.

A few years ago, I was disappointed by the ingredients in our favorite taco packet. Not to mention how much sodium was in it, and the MSG. MSG gives me headaches, and I know that it does to many others as well. I searched for a spice mix that I could use and found one at Recipe Zaar. I have adapted it to suit our tastes. I use this for Tacos and Fajitas, as well as any time I want to add a little Mexican twist to any thing. I prepare this large batch and save in an emptied spice container so that I have it on hand anytime I need it.

Last year, at our co-op, I was the cooking teacher and we made fajitas for the "dinner" class. Many students (and their parents) still tell me that they use this recipe exclusively when making Mexican Dishes. That, to me, is the highest compliment.

I'll share the mix recipe first, then how to use it in tacos.


Taco/Fajita Seasoning Mix

5 Tbs. Spice Club Chili Powder
5 Tsp. Spice Club Ground Cumin
2 Tsp. Spice Club Ground Black Pepper*
4 Tsp. Sebree Table Salt
1 Tsp. Spice Club Paprika*
2 Tsp. Spice Club Dried Oregano
2 Tsp. Spice Club Garlic Powder
2 Tsp. Spice Club Onion Powder
1/2 Tsp. Spice Club Red Pepper Flakes*

*add more of these ingredients if you like it even spicier.

Mix all ingredients together well and store in an air-tight container. This entire container costs about $1.25.


Turkey Tacos

1 20 oz package of Fit & Active Ground Turkey ($2.49)
3 Tbs Taco/Fajita Seasoning Mix (above) (.25)
1 8 oz can Happy Harvest Tomato Sauce (.29)
1/2 Cup Water
1 Package La Mas Rica Flour Tortillas (1.49) - you may use the corn or the crunchy corn...whatever YOUR pref
Half of 8oz brick Happy Farms Colby Jack cheese, shredded (.89)
2 Cups finely shredded lettuce (.33 - I use about a half a head of romaine hearts which is $1.99/3 heads)
1 Cup Happy Farms Sour Cream (.49)
La Mas Rica Salsa (choose type and heat - prices will vary - for means of calc, .50 avg of used salsa)
La Mas Rica Guacamole (.82) (this is 3.29 for two internal packages...we use about half of on package in a meal)


Brown ground turkey. Sprinkle spices over and cook for one minute until you can smell the aroma of the spices. Add tomato sauce and water. Bring to boil, then reduce to a slow simmer. Simmer for 10 minutes stiring occasionally.

Warm up tortillas as instructed on packaging.

This makes about 12 tacos @ about .63 per taco.

Serve topped with your favorite ingredients.

Tuesday, March 2, 2010

Using Aldi Convenience Food for Inexpensive Yumminess


Hi there.

I'm taking it a minute to thank those who have chosen to follow me, and to comment, etc. It means the world to me.

The other night for dinner we had something that is not technically a recipe, more using the Aldi convenience items for yumminess. If you have not tried the Bremer Cheese Ravioli ($2.99/60 - I used half), Reggiano Traditional Pasta Sauce ($.99) or the Mama Cozzi Meatballs ($1.99/30 meatballs), give them a whirl! I cooked the meatballs in the crock-pot with the sauce on low for about 5 or so hours. I prepped the Ravioli as directed on the package. I served the meatball sauce over the ravioli. It was very yummy. Very easy. And a great, inexpensive meal (six servings @ $0.75/serving!!!) for a rushed and busy night. You might question the logic that pasta sauce is a vegetable, but, on busy nights it is to me!

Before I start the next statements, I want to assure everyone (and those that know me in real life know this), I DO NOT WORK for Aldi, nor do I get paid to sing their praises.

While at the store the other day, I grabbed the circular that starts March 7th, I'm happy to annouce that the Priano Italian specialty items will start appearing in Aldi's . These are wonderful to stock up on while they last. Unique sauces and frozen pastas that make for a quick dinner prep. There are great snacks and appetizers, too. I believe it is the season of Lent that brings it on, folks having meatless Fridays and all.

Just be on the look out and stock up while it's here. I'll hope to post some recipes using these fun products in the coming month.


THANKS!!!

Chinese Pork & Peppers


Well, Aldi does not normally carry a lot of chinese food items. They do have things in their freezer case. Once a year, around the Chinese New Year (Lunar Festival), they bring in items under the label "Asian Specialties". During this time of year they carry soy sauce, simmering sauces, rice noodles, etc. This is a great time to stock up. Seeing these in my local Aldi this week gave me the desire for a dish we haven't had in a very long time.

Three summers ago, we hosted our first Chinese Exchange Student for three weeks. We thoroughly enjoyed ourselves. Julia (her Americanized name) loved to cook, and showed us how to make a few authentic dishes while she was here. This was one of them.

You need to know ahead of time that there are two ingredients that are not available at Aldi (at least at mine, if they're available in yours...more power to ya!). Corn Starch and Scallions. The prices I included were from a local grocery store, Acme.

Chinese Pork & Peppers

1.5 lb. Roseland Boneless Pork Loin Chops, julienned very thinly, in about 1" lengths ($4.49)
1 large green pepper, julienned (.99/2) (I quarter it and then slice in thin 1" long strips)
1 scallion, thinly sliced on the bias (.99/8 stalks)
2 tbs corn starch ($1.19/1 lb)
2 tbs Asian Specialties light soy sauce (.99/btl)
3 tbs oil

1 Cup White Rice (.99/1 lb)
1 Tbs Butter ($1.99/lb)
2 Cups Hot Water

Prepare the rice as follows: in a 2 quart pot with tight fitting lid, melt butter. Add 1 cup dry rice and saute in butter until coated in butter and "nutty" smelling. Be careful not to burn rice. Add 2 cups water, reduce heat to low and cover. Cook for 20 minutes. Turn off heat. Let sit, covered, until ready to serve.

Meanwhile, in a large bowl, mix the thinly slice pork strips, corn starch and soy sauce together. Mix well to coat ALL of the pork. Set aside for 5 or so minutes.

Using a LARGE wok or LARGE skillet, heat the 3 tbs. of oil on HIGH heat. When the oil is hot, add the pork, reduce heat to medium high. Stir fry meat in the oil. When the meat is ALMOST done, add the peppers. Stir around in the pan just to quickly cook the peppers. They need to be tender crisp. Sprinkle on sliced scallions just before serving, stir in.

Serve over rice.

This makes 6 servings @ $.92/serving. :)

***I know we Americans would very easily lose the oil in the hopes of good health, BUT don't miss the awesome opportunity to taste the food the way it was meant to be.***

Monday, March 1, 2010

Aldi Party Mix


I know, I know, it's not holiday time. It's not time for party mixes and finger snacks. Well, sorry, I live in a house where the party mix is a particular favorite. It's an easy grab, easy pack snack that is super cheap, and very easy to make. You can pretty much use the Chex mix recipe using Aldi ingredients and it turns out fine. I've created a mix that works well for our family. I hope you enjoy it as much as we enjoy it.

Aldi Party Mix

9 Cups Millville Rice or Corn Squares ( or a combination) ($1.89/box)
2 Cups Corn Chips (the curly kind like Fritos) (.99/bag)
1 Cup Savoritz Sharks (1.09/box)
1 Cup Savoritz Oyster Crackers (.89/bag)
1 Cup Southern Grove Deluxe Natural Almonds (3.89/1 lb. bag)
1 stick Country Creamery unsalted Butter, melted (1.99/lb)
1 Tbs. Spice Club Seasoned Salt (.99/jar)
1 Tbs. Worchestershire Sauce (our brand right now is Tate's @ 1.29/btl)
1 Tsp. Spice Club Garlic Powder (.99/jar)
1 Tsp. Spice Club Onion Powder (.99/jar)


Preheat oven to 250 degrees.

In a LARGE bowl, combine rice or corn squares, corn chips, Sharks, oyster crackers and almonds. Melt butter and add in seasoned salt, Worchestershire sauce, garlic powder and onion powder. Mix well. Pour over cereal mixture and stir well to coat evenly.

Pour mix into large roasting pan and place in the oven. Bake for 1 hour, stirring every 15 minutes. Once out of the oven, pour out on to paper towels to cool. Store in an airtight container. Makes 14 1 Cup servings @ $.30 each! :)